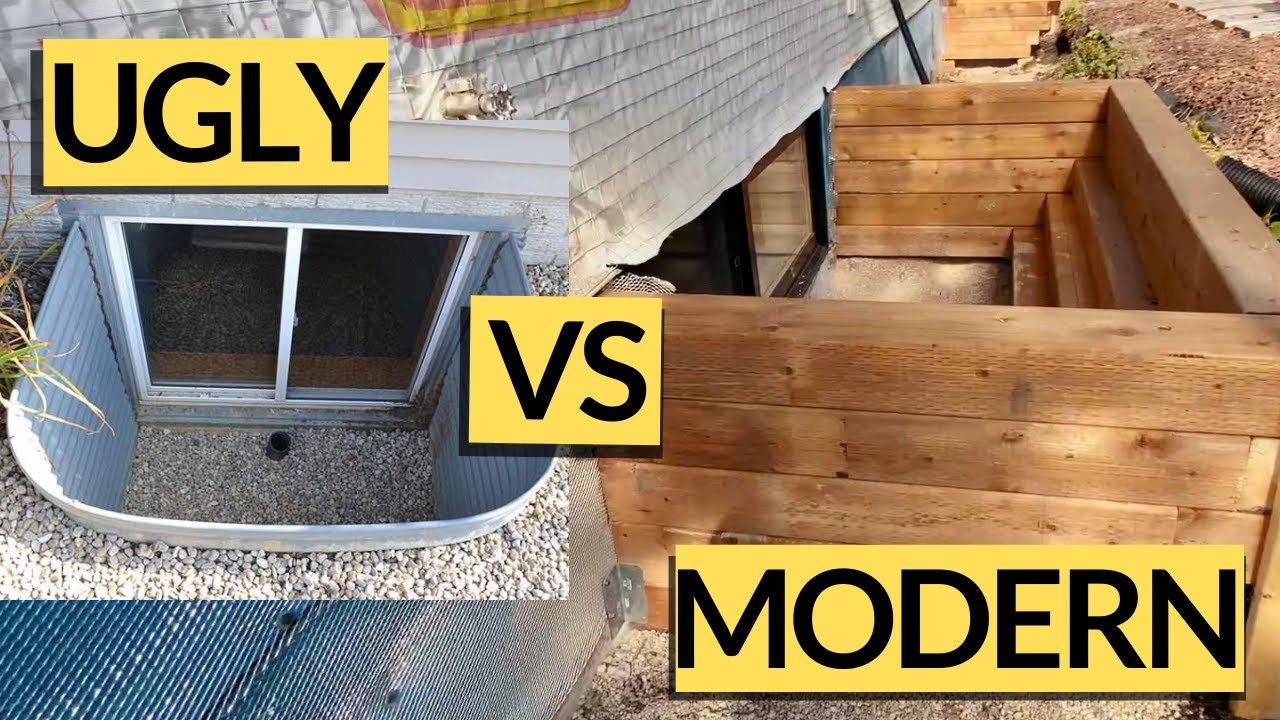
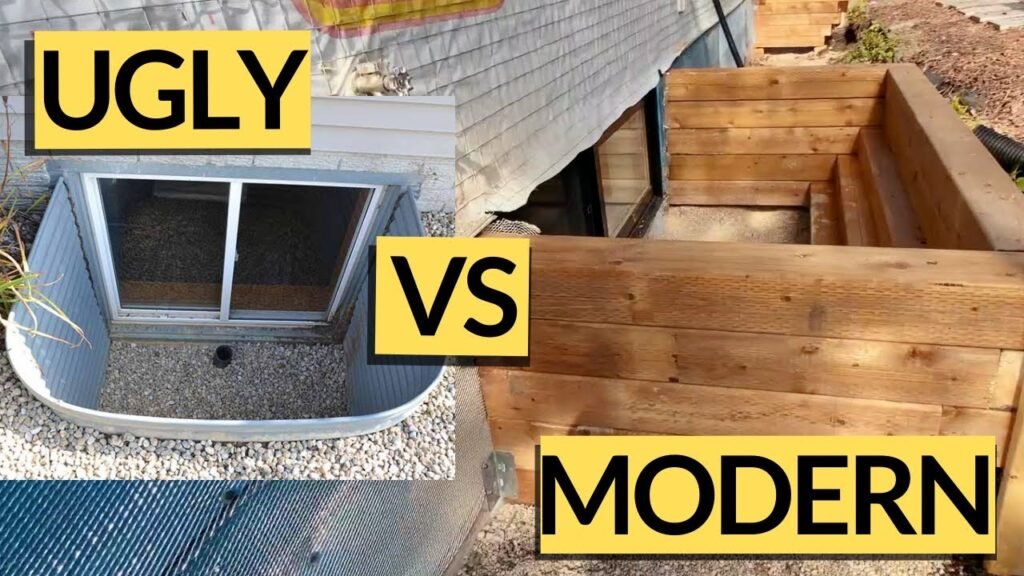
How’s it going, guys? Today I want to show you how to swap out a window well.
As we’re doing some landscaping around the house and installing a concrete patio, it’s the perfect time for me to freshen up two corroded window wells.
One of them is not in terrible condition, but the other one is barely attached to the house and looks pretty bad.
I’ll be replacing them with plastic non-metallic window wells of approximately the same size, featuring a flat front instead of a rounded one.
Additionally, I’ll be adding a translucent cover with structural support that allows light into the basement.
Join me as I walk you through each step, including digging out the old well, installing the new one, securing it to the foundation, and ensuring proper drainage within the window well.
Digging Out the Old Window Well
Before we begin, it’s crucial to note the importance of calling 811 or the local utility service, such as Julie in our area, to mark any underground cables or pipes. This precautionary step ensures we won’t accidentally damage any essential utilities while digging.
Once everything is marked and safe, we can dig out the old window well. Taking care to leave some extra dirt in the base, we can focus on building it up later.
It’s important to pay attention to the position of the drain, which should be correctly placed two to three inches below the window sill, allowing water to flow away from the window and into the drain system.
Removing the Old Window Well
Removing the fasteners that hold the old window well in place can be a bit challenging. Scott shares his experience with nails and screws that were used to secure the metal framing.
By carefully prying them off, we can detach the old window well from the house. In some cases, trimming nearby trees may be necessary to create more room for removal.
Once all the fasteners are removed, we can proceed to clean the area and prepare for the installation of the new plastic window well.
Installing the New Window Well
To secure the new window well, we will use quarter-inch, one and three-quarter-inch-long tapcon concrete screw anchors. You can’t ignore the importance of leveling and measuring to ensure a proper fit.
By setting the right side first and securing it to the foundation, we establish a reference point for leveling. Once leveled, the left side can be positioned and secured accordingly.
I can’t emphasize enough to maintain consistent dimensions along the window well to ensure a snug fit against the wall. Careful drilling using a reference line on the masonry bit helps avoid going too deep into the foundation.
Finishing Touches and Backfilling
With the window well securely in place, it’s time to build up the base and ensure proper drainage. You can add dirt and gravel to achieve the desired level and maintain stability. But make sure to check the dimensions of the window well to ensure it doesn’t flex in and out, as the plastic material may have some flexibility. By securing the window well with additional screws, You should ensure that it remains sturdy. Finally, you can backfills the area, completing the installation process.
Cleaning & maintaining Window Well Drains
And it’s more of a public service announcement for those of you who have basements. And if you have a basement, more than likely, you have windows in your basement. And more than likely again, you probably have window wells.
Window wells are great for allowing sunlight to go through your basement windows, and of course, they allow you to get out of the basement in an emergency. But something that I think a lot of people don’t think about with their window wells is maintenance.
Given the amount of water that can accumulate after a heavy rain, it reminded me what a big deal it is to make sure you clean the drainage in your window well.
Because if you don’t clean the drainage, guess what? The water is going to go above that drainage pipe and seep into your house and into your basement.
- It’s important to make sure that you intermittently clean your drainage or at least the leading into your drainage. Because what’s going to happen over time is all the leaves and all the gunk gets on top of it, and it’s not going to allow any water to go down your drainage pipe.
- If all the gunk stuff keeps staying on top of your drainage, the water level will rise and rise, and it’s going to go and get through the window or get through some of the cracks.
So all you do, maybe every few months or so, is do this. Just reach your hand in there, clean it out, and that’s it.
Now, a lot of people will also put a plastic cover that you can get at Home Depot or Lowe’s or anything like that. It helps keep some of the dirt and grime and leaves out, but it also stimulates a lot of weed growth underneath too because it creates kind of a greenhouse effect.
So I’ll just go by every couple of months or so and just clean out my drainage. It’s as easy as that, and you avoid perhaps disaster with water getting into your basement.
Conclusion and Final Thoughts
Completing this window well replacement project usually takes about two and a half hours and provides a great DIY opportunity that saves money compared to hiring professionals.
Swapping out a window well is a manageable DIY project that can enhance the appearance and functionality of your home.
By following our this step-by-step guide, you can confidently replace corroded window wells with new plastic non-metallic ones. Remember to prioritize safety by calling for utility markings before digging.
With careful attention to detail and adherence to the provided instructions, you’ll achieve a sturdy and visually appealing window well. Enjoy the satisfaction of completing this home improvement project and creating a fresh look for your property.